Hardwood Floor Damage: Sanding vs Board Replacement vs New Flooring
Homeowners facing hardwood floor damage are often presented with a complex and costly decision: to repair or to replace. The choice between sanding, replacing individual boards, or installing entirely new flooring is not merely aesthetic or financial; it is a technical determination governed by the physical state of the material and its supporting structure. A methodical assessment based on measurable parameters—damage depth, affected area, board location, and subfloor integrity—provides the only reliable path to a durable and economically sound outcome. This analysis establishes a criteria-based framework, aligned with industry standards, to systematically evaluate damage severity and select the appropriate intervention.
The long-term performance and value retention of a hardwood floor depend on selecting a solution that matches the problem’s scope. Misapplying a surface-level refinish to structurally compromised wood, or opting for a full replacement when a spot repair would suffice, represents a significant misallocation of resources. By focusing on diagnostic precision and the technical limits of each repair method, homeowners and professionals can ensure results that meet established benchmarks for finish integrity, dimensional stability, and overall floor longevity.
Foundational Concepts: Wear Layer, Damage Typology, and Industry Benchmarks
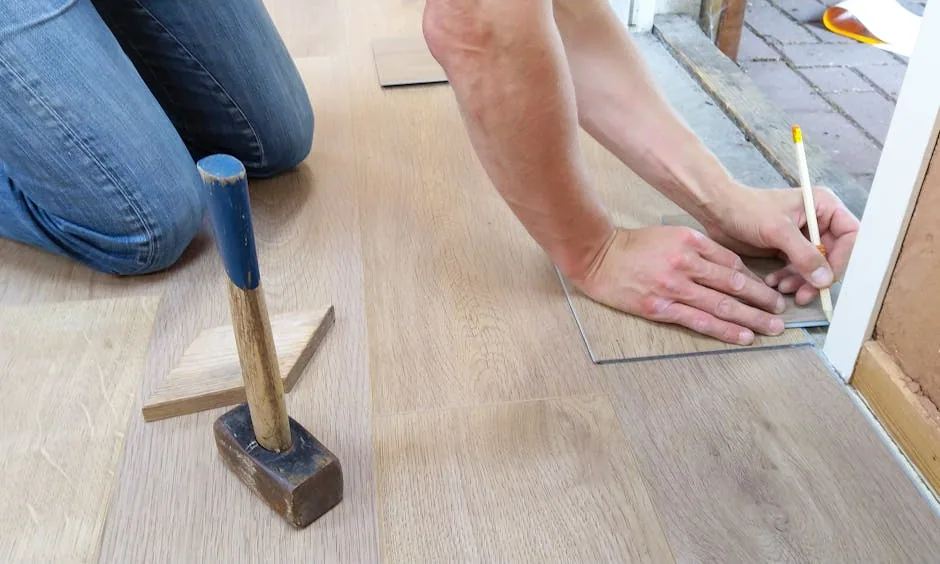
Photo by ClickerHappy on Pexels
Effective decision-making for hardwood floor remediation begins with a precise understanding of three core technical concepts: the wear layer, the classification of damage, and the quantitative benchmarks that separate viable repairs from necessary replacements. These concepts form the immutable constraints within which all practical solutions must operate.
The wear layer is the most critical metric. It refers to the thickness of solid wood above the tongue of a milled hardwood plank. This is the material available for sanding and refinishing over the floor’s lifetime. The National Wood Flooring Association (NWFA) provides a key standard: after any sanding, a minimum of 1/32 inch (approximately 0.8mm) of wear layer should remain to ensure structural integrity and proper finish adhesion. For older floors, this remaining thickness is the limiting factor. A floor with a 3/4-inch thick board may have only 1/8 inch of usable wear layer left after decades of sanding. Once damage penetrates deeply into or through this layer, sanding ceases to be a permanent solution, as it will either fail to remove the damage or will compromise the board’s mechanical function.
Damage must be categorized by its typology and depth. Surface-level damage is confined to the finish and the uppermost microns of wood. This includes fine scratches from foot traffic, light scuffs, and minor fading from UV exposure. Intermediate damage affects the wood itself but does not fully compromise the wear layer. Examples are moderate gouges, deeper scratches, and stains that have penetrated the finish but not the full wood fiber. Structural damage penetrates the wear layer, affecting the board’s geometry or integrity. This category includes deep gouges that reach the tongue, water damage causing cupping or crowning, splits and cracks that run through the board, and biological decay like rot. The typology directly dictates the repair method’s window of applicability.
Finally, we establish key benchmark metrics for assessment. Damage Depth is measured in millimeters from the board’s surface. Extent is calculated as the percentage of total floor area showing significant (intermediate or structural) damage. Location Criticality evaluates whether damaged boards are in the easily repairable “field” (central areas), or in complex patterns like herringbone, borders, or feature strips, where replacement complexity increases exponentially. These measurable parameters move the decision from subjective guesswork to an objective evaluation.
Damage Assessment Protocol: A Four-Parameter Diagnostic
A systematic assessment is non-negotiable for selecting the correct intervention. This protocol involves evaluating four independent parameters, each with defined methods and decision thresholds. Skipping any parameter risks selecting an inadequate solution that fails prematurely or is economically irrational.
Parameter 1: Depth Analysis
The first step is to determine if damage has breached the wear layer. For obvious holes or cracks, visual inspection suffices. For stains and gouges, a more precise method is required. In an inconspicuous area, such as inside a closet, you can use a thin, stiff probe (like a fine awl or a straightened paperclip) to gently test the depth of a similar flaw. More reliably, examine a cross-section of the flooring. This may be possible at a heat register vent, where a board edge is exposed, or by carefully prying up a piece of quarter-round molding to see the board’s profile. Measure the total board thickness and estimate the remaining wood above the tongue. If the deepest point of damage is within 1mm of the estimated top of the tongue, the wear layer is critically compromised.
Parameter 2: Extent Calculation
Map the damaged areas. For localized issues, physically mark each board. For widespread wear, divide the room into quadrants. Calculate the square footage of significantly damaged area and divide it by the total square footage of the floor. This yields the affected percentage. Thresholds are guiding principles: Damage affecting less than 20% of the total area is typically a candidate for localized repair. Between 20% and 40%, the economic calculation between extensive spot repair and full refinishing or replacement becomes nuanced. Damage exceeding 40% of the area often makes full-floor solutions (sanding or replacement) more practical and cost-effective, as the labor for numerous individual repairs can surpass that of a blanket approach.
Parameter 3: Location & Pattern Mapping
The technical difficulty of board replacement is a function of location. Field boards in a standard random-plank installation are the simplest to replace, as they are surrounded by other removable boards. Boards that are part of a geometric pattern (herringbone, chevron), a decorative border, or that run into fixed cabinetry or a fireplace hearth present a high skill threshold. Replacement here requires precise pattern-matching, custom cutting, and potentially disassembling a section of the floor. The decision criterion is this: if the damaged boards are in a complex pattern and you lack access to a craftsman skilled in historical restoration techniques, board replacement may not be a viable option, pushing the decision toward full-floor sanding (if wear layer allows) or replacement.
Parameter 4: Subfloor & Structural Evaluation
No surface repair is valid if the substrate is failing. This evaluation often requires tools. A moisture meter is essential; pin-type meters can be inserted into existing seams or probe from below to check for elevated moisture levels in the subfloor. Consistent readings below 12% for wood subfloors are generally acceptable, while spikes or readings above 15% indicate a problem that must be resolved first. Physically walk the floor, noting any sponginess, excessive vertical movement, or persistent squealing. These are failure signals indicating fastener failure, subfloor delamination, or rot. A localized soft spot under a single water-damaged board may be addressed during that board’s replacement. Widespread instability mandates subfloor repair and likely full floor replacement.
Solution Analysis: Technical Specifications and Applicability Windows
Each repair or replacement solution has a defined “applicability window”—a set of conditions under which it is the technically correct and durable choice. Applying a solution outside its window guarantees suboptimal results or failure.
Solution A: Sanding & Refinishing
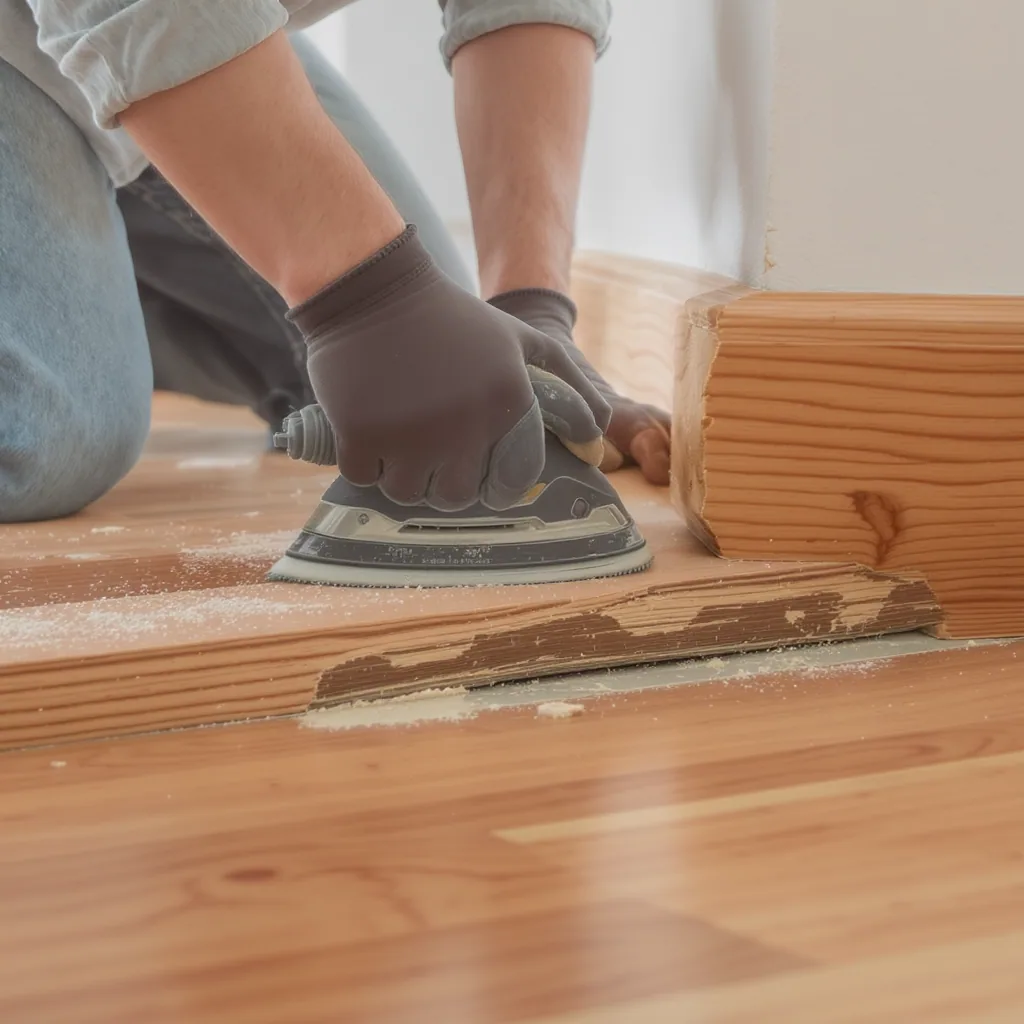
This process involves mechanically abrading the existing surface to bare, clean wood and applying new finish coats. Its applicability window is narrow and strict: the floor must have a sufficient wear layer (as defined in Parameter 1), the damage must be predominantly surface-level or shallow intermediate, the subfloor must be stable and level, and board gaps must be within an acceptable range (typically less than the width of a dime). The process is a sequence: coarse-grit sanding (e.g., 36-grit) to remove old finish and level minor imperfections, followed by progressively finer grits (60, 80, 100) to eliminate sanding scratches. After thorough dust extraction, stain is applied if a color change is desired. Finally, multiple coats of a modern finish like polyurethane (oil- or water-based) or a penetrating oil are applied, with light sanding between coats for adhesion. The primary limit is material: you cannot sand what is no longer there. A common failure mode is attempting to sand a floor with a critically thin wear layer, resulting in “breaking through” to the tongue or creating an uneven surface that cannot hold a new finish properly.
Solution B: Selective Board Replacement
This is a surgical intervention for localized structural damage. Its applicability window requires that the damage is confined to a discrete number of boards (aligned with Parameter 2), that the boards are in a replaceable location (Parameter 3), and that matching material can be sourced. The technical requirements are high. Replacement wood must match the existing species, grade, width, and thickness. For older floors, this may require sourcing from a specialty lumberyard or a reclaimed wood supplier. The removal technique depends on the installation method. Tongue-and-groove boards typically require precise cutting to remove the damaged board’s center while preserving the tongues and grooves of adjacent boards, allowing the new piece to be slid and locked into place. Face-nailed boards are simpler to remove but require careful fastener placement in the new board. The final and most critical step is finishing integration: the new board must be sanded level with the surrounding floor and finished to match the sheen and color of the existing finish, a task that often requires blending the finish over several adjacent boards for a seamless look.
Solution C: Full Flooring Replacement
This is a complete substrate-up renovation. It is indicated when the applicability windows for sanding and spot repair are closed. Specific triggers include: widespread structural damage or wear layer exhaustion (Parameter 1), damage extent exceeding 40-50% (Parameter 2), a failed subfloor (Parameter 4), or a homeowner’s desire for a complete change in wood species, plank width, or layout pattern. The process begins with demolition and removal of the existing flooring and any compromised underlayment. The subfloor is then inspected, repaired, leveled, and moisture-tested. The new flooring must be acclimated to the home’s interior environment for a period specified by the manufacturer, typically 3-7 days. Installation methods include nail-down (stapling to a wood subfloor), floating (where planks lock together over a pad, unattached to the subfloor), or glue-down (direct adhesion to concrete or wood). Each method has specific requirements for subfloor flatness and moisture barriers, as detailed in manufacturer technical manuals which serve as the primary authority for installation best practices.
Comparative Decision Matrix: Cost, Time, Longevity, and Value
The following matrix provides a consolidated, criteria-based comparison of the three primary solutions. It translates the technical parameters into practical decision factors of cost, time investment, expected outcome longevity, and impact on property value.
| Decision Factor | Sanding & Refinishing | Selective Board Replacement | Full Flooring Replacement |
|---|---|---|---|
| Typical Cost Range (per sq. ft.) | $3 – $8 | $200 – $600+ (per board, including finish blending) | $8 – $15+ (material & labor) |
| Project Timeline | 3-5 days (incl. drying time) | 1-3 days (for a small area) | 5-10+ days (incl. demo, prep, install, finish) |
| Key Prerequisite | Sufficient wear layer thickness (>1mm post-sand) | Availability of matching wood; repairable board location | Sound, dry, level subfloor |
| Addresses Structural Issues? | No | Only in the specific replaced boards | Yes, if subfloor is repaired |
| Expected Longevity (with proper maintenance) | 10-15 years (or until wear layer is exhausted) | Should match life of surrounding floor | 25+ years (lifetime of the product) |
| Impact on Home Value | High ROI; preserves original character | Neutral to positive if seamless | High; allows for modernization and is a major selling feature |
| Primary Risk | Over-sanding, creating an uneven surface or exposing tongues. | Visible seams, color mismatch, or dimensional instability of new wood. | Improper installation (moisture, acclimation, fastening) leading to premature failure. |
Narrative analysis of this data reveals clear trade-offs. Sanding and refinishing offers the highest return on investment for floors within its technical window, but it provides zero remedy for underlying structural problems. It is a surface renewal only. Selective board replacement balances cost and targeted repair but is highly dependent on two variables: the skill of the craftsman and the quality of the material match. A poor match or clumsy installation can be more visually distracting than the original damage. Full flooring replacement is the most capital-intensive option but is also the only one that resets the clock entirely, addresses systemic issues, and allows for a complete design change. Its longevity expectation is based on the warranty and life cycle of the new materials, assuming NWFA or manufacturer standards for installation are followed meticulously.
Practical Implementation and Standards Alignment
Once a solution path is selected, its success is determined by adherence to documented best practices and standards. Deviation from these protocols is the root cause of most repair failures.
Sanding/Refinishing Best Practices
The sanding sequence must follow a logical grit progression; skipping from a 36-grit to an 80-grit, for example, will leave deep scratches that become visible under the finish. A modern, multi-stage dust containment system is non-negotiable for air quality and for ensuring a contaminant-free surface for finishing. Finish application has strict environmental controls: temperature should be between 60-80°F and humidity between 35-55% for most polyurethanes. Applying finish outside these windows can lead to blushing (cloudiness), poor adhesion, or extended drying times. Each coat must be allowed to cure fully as per the manufacturer’s instructions before light abrading and application of the next coat.
Board Replacement Technical Protocol
The goal is to remove the damaged board while causing minimal disturbance to its neighbors. For tongue-and-groove floors, the standard method involves using a circular saw to cut down the center of the damaged board, then using a chisel to break out the center pieces, leaving the tongues and grooves of adjacent boards intact. The new board must have its bottom lip of the groove removed so it can be angled into place and then dropped down, locking into the tongue of the neighboring board. It is then face-nailed or blind-nailed at an angle through the tongue. The replacement wood must be acclimated in the room where it will be installed for a minimum of 72 hours to reach equilibrium moisture content with the environment, preventing future shrinkage or expansion. This guidance is consistently emphasized in woodworking and flooring industry publications to prevent callbacks due to dimensional instability.
Full Replacement Considerations
Prior to installation of any new flooring, a moisture test of both the subfloor and the new wood planks is mandatory. For concrete subfloors, a plastic sheet test (ASTM F1869) or quantitative moisture meter reading is required. Expansion gaps—typically 1/2 inch to 3/4 inch around the perimeter—must be maintained and covered by baseboard or quarter-round molding. The selection of underlayment is critical: for floating floors, it provides sound dampening and moisture vapor protection; for nail-down floors, felt paper is often used as a moisture buffer. Following the specific fastener schedule (nail/staples per inch, adhesive trowel notch size) specified by the flooring manufacturer is essential for warranty compliance and long-term performance.
Final Diagnostic Checklist and Path Selection
To operationalize the preceding analysis, use this concise, actionable checklist. Answer each question with a definitive “Yes” or “No” based on your measured data from the Four-Parameter Diagnostic.
- Wear Layer Sufficiency: Is the remaining solid wood above the tongue at least 1/32 inch (0.8mm) thick AFTER accounting for the sanding depth needed to remove damage? (Check at multiple locations).
- Damage Extent Limit: Is the total area with significant (intermediate or structural) damage less than 20% of the total floor area?
- Repairable Location: Are the damaged boards located in the field of the floor, not within a complex border, pattern, or running under fixed obstructions?
- Subfloor Integrity: Is the subfloor structurally sound, dry (moisture readings consistently below 12%), and free of major squeaks or movement?
Map your answers to a recommended solution path:
- If you answered YES to ALL FOUR questions: Your floor is a strong candidate for sanding and refinishing. Proceed with obtaining quotes from reputable refinishers.
- If you answered NO to Question 1 (insufficient wear layer) but YES to 2, 3, and 4: Sanding is not viable. If damage is localized, board replacement is the logical path. If damage is widespread, full replacement must be considered.
- If you answered NO to Question 2 (extensive damage) but YES to 1, 3, and 4: The economic scale may favor full-floor sanding over numerous spot repairs. Obtain comparative quotes for both sanding the entire floor and for the cumulative cost of replacing many individual boards.
- If you answered NO to Question 3 (complex location): Board replacement requires a high-skill professional. If the wear layer is sufficient (YES to Q1), full-floor sanding may be the simpler solution. If not, full replacement may be necessary.
- If you answered NO to Question 4 (subfloor issues): No surface repair should proceed. Subfloor problems must be diagnosed and repaired first. This often involves removing the existing flooring, making full replacement the likely final step.
Before finalizing your decision, especially if your answers are near any threshold, engage a professional for validation. Collect your data—clear photos, your wear layer measurements, moisture readings, and your completed checklist—and present it to a certified NWFA professional or a highly-rated flooring contractor. This evidence-based approach will yield a more accurate quote and a technically sound outcome. For further research on material properties and installation standards, consulting resources like the APA – The Engineered Wood Association for subfloor and underlayment guidance can be invaluable.
Common Technical Oversights and Preventive Actions
Even with a sound plan, projects fail due to predictable oversights. Recognizing and preventing these common mistakes is the final layer of risk management.
Mistake: Sanding a floor with an insufficient wear layer, resulting in ‘breaking through’ to the tongue or creating an uneven surface that cannot hold finish.
Preventive Action: Always measure wear layer thickness at multiple points, including in closets or under vents, before committing to refinishing. Use a precision ruler or depth gauge.
Mistake: Replacing boards without proper acclimation, leading to dimensional instability (cupping, gaps) post-installation.
Preventive Action: Acclimate replacement wood to the home’s interior temperature and humidity for a minimum of 72 hours, or as per the wood supplier’s specifications, before installation.
Mistake: Ignoring subfloor moisture prior to any repair or replacement, trapping moisture and guaranteeing future failure.
Preventive Action: Conduct moisture mapping of the subfloor using a pin-type moisture meter. Ensure readings are within acceptable range (typically <12% for wood subfloors) and consistent across the area.
Your Next Step
The decision between sanding, board replacement, and new flooring is not subjective; it is a function of measurable damage parameters and material constraints. Begin with the diagnostic checklist to gather essential data on depth, extent, location, and subfloor condition. This evidence-based approach will direct you toward the technically sound and economically rational solution. For final validation, especially near decision thresholds, engage a professional who can provide measurements and quotes grounded in NWFA standards.
Key Takeaways
- The decisive factor is damage depth relative to the wear layer; penetration typically eliminates sanding as a permanent fix.
- Board replacement is cost-effective for localized damage but requires skilled installation and precise wood matching for seamless results.
- Full flooring replacement is warranted for systemic structural or moisture issues, or when the existing floor no longer meets functional or aesthetic needs.
- Always verify subfloor condition before investing in any surface-level repair; a failing substrate dooms any new flooring.
- Adherence to industry standards for material acclimation, moisture control, and installation technique is non-negotiable for long-term durability.
Frequently Asked Questions
When should I sand hardwood floors instead of replacing them?
You should sand and refinish your hardwood floors when the damage is confined to the surface (scratches, stains, fading) and a sufficient wear layer remains—typically at least 1/32 inch of solid wood above the tongue after sanding. This solution is ideal for uniform wear across most of the floor and when the subfloor is structurally sound. It is a renewal process, not a repair for structural flaws.
How do I know if a damaged floorboard needs to be replaced?
A floorboard needs replacement when the damage is structural: deep gouges that reach the tongue, cracks that split the board, water damage causing cupping or rot, or severe staining that cannot be sanded out without compromising the wear layer. Additionally, if the board is loose, warped, or creating a tripping hazard, replacement is the correct remedy, provided the surrounding floor and subfloor are in good condition.
Is it more cost-effective to repair or replace a hardwood floor?
Cost-effectiveness is dictated by the scale and type of damage. For minor, surface-level wear over a large area, sanding and refinishing is almost always the most cost-effective option, offering a high return on investment. For a few isolated, deeply damaged boards, selective replacement is more cost-effective than full replacement. However, when damage is widespread, structural, or the subfloor is compromised, full replacement becomes the more cost-effective long-term solution, as piecemeal repairs would be numerous, expensive, and ultimately insufficient.