Bathtub and Shower Resurfacing vs Replacement: A Cost Comparison
Staring at a chipped, stained, or just plain ugly bathtub can make you want to rip the whole thing out. But before you grab the sledgehammer, let’s talk about what that impulse really costs—in money, time, and hassle.
I’ve been on both sides of this: helping homeowners salvage a perfectly good tub and, when necessary, overseeing a full gut job. The right choice isn’t about what’s theoretically best; it’s about what works for your bathroom, your budget, and your life right now.
When Resurfacing Makes Sense (And When It Doesn’t)
Photo by Erik Mclean on Pexels
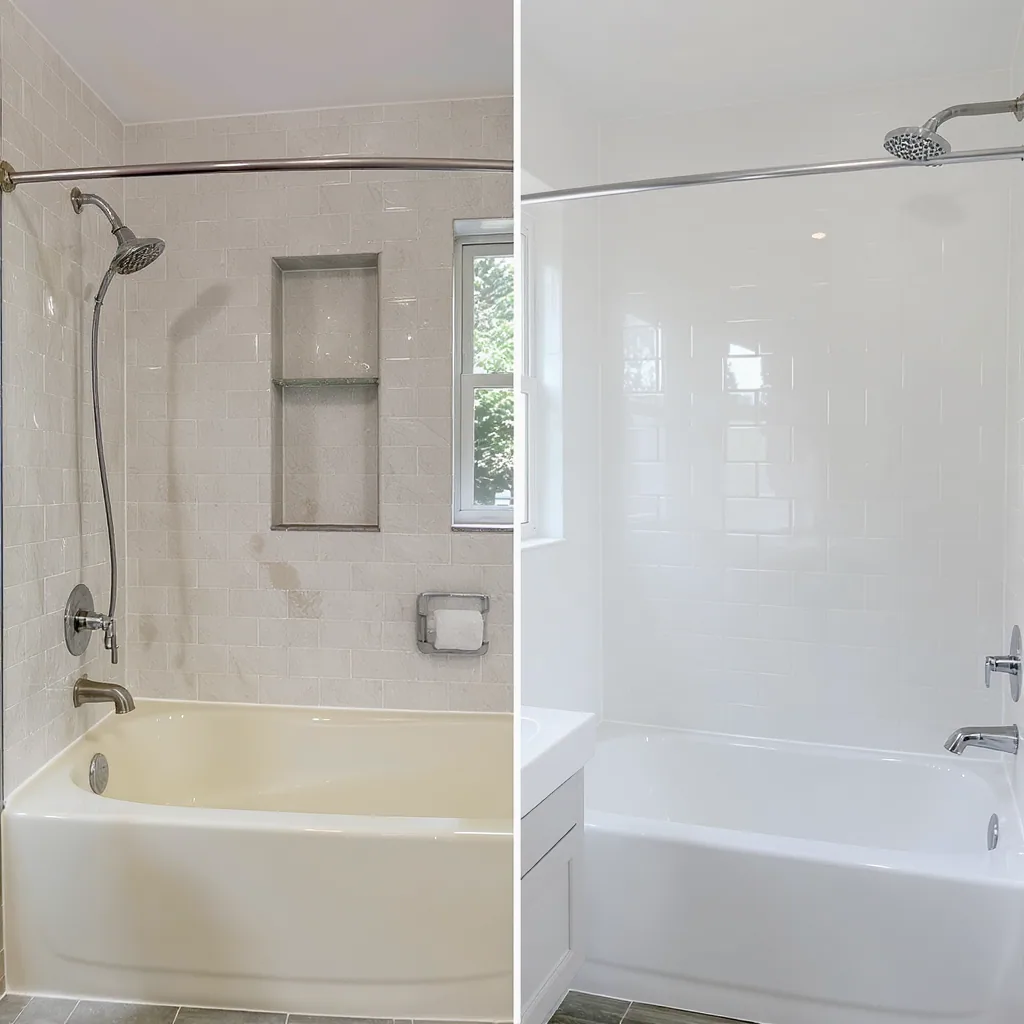
Let’s get practical. Resurfacing—spraying a new coating over your existing tub or shower—isn’t magic. It’s a great solution for specific, common problems. I’ve seen it save thousands. It’s perfect for surface issues: that yellowing from hard water, minor chips, or just an outdated color you hate. The process involves deep cleaning, etching the old surface, and applying a new epoxy or acrylic urethane coating. The big win? It’s done in a day, for usually under $500. But here’s the field truth: it fails if the underlying material is compromised. If your fiberglass is flexing, your cast iron has deep rust, or your acrylic has a soft spot, the new coating will crack. It’s a bandage, not a surgery.
The most successful jobs I see are on old, solid cast iron or steel tubs. The material is rigid and provides a perfect base. Porcelain tile surrounds can also be refinished beautifully if the grout is sound. For acrylic or fiberglass, the success hinges entirely on rigidity. Press down firmly on the floor and walls. If you feel any give, any flex at all, walk away from resurfacing. That movement will transfer directly to the new coating and cause it to fail. Another good candidate is a rental property where you need a cosmetic uplift quickly and cheaply without the mess of a full renovation.
Now, let’s talk about the “doesn’t” side. Resurfacing is a terrible choice if you have any underlying water damage. If the wall behind the tub is soft, if the subfloor is questionable, or if there’s active leaking, you’re just painting over a problem that will explode later. It’s also not ideal for showers with recurring mold issues in the grout; the new coating won’t solve the ventilation or waterproofing problem causing the mold. Furthermore, if you dislike the shape, size, or ergonomics of your current tub, resurfacing does nothing to change that. You’re stuck with the same footprint.
One critical, often-overlooked factor is the existing finish. If your tub has been previously refinished with a DIY kit or a poor-quality professional job, most reputable pros won’t touch it. Stripping that old coating is a nightmare and the adhesion of the new layer is compromised. They need a clean, original surface to work with. Always disclose this history when getting a quote.
Side-by-Side: Costs, Time, and Longevity
Talking about averages is useless if you don’t know what’s included. Here’s a breakdown from jobs I’ve priced out, so you know what line items to look for. Remember, ‘bathtub replacement cost’ often omits the domino effect: new wall surrounds, plumbing adjustments, and floor repair.
The cost difference isn’t just incremental; it’s exponential. Resurfacing is a line item. Replacement is a project with layers of cost. For resurfacing, you’re paying for labor, materials (the coating), and minimal prep. For replacement, you’re paying for demolition, disposal, the new tub unit or shower pan, the wall surround (tile, acrylic, or solid surface), plumbing labor to disconnect and reconnect, potential framing adjustments, waterproofing materials and labor, installation, caulking, and cleanup. A lowball quote often leaves out disposal, plumbing, or the wall finish.
| Item | Resurfacing / Reglazing | Full Replacement |
|---|---|---|
| Average Total Cost Range | $400 – $800 | $2,500 – $5,000+ |
| Project Timeline | 4-8 hours of work, 24-48 hour cure time before use. | 3-7+ days (Demolition, prep, install, waterproofing, finishing). |
| Expected Lifespan | 5-10 years with proper care. High-use showers may be on the lower end. | 15-30+ years, depending on material quality and installation. |
| Best For Scenario | Solid, non-flexing tub/shower with cosmetic issues (stains, color, light chips). Short-term housing, rentals, or quick home sale prep. | Structural damage, desired layout/design change, failing waterproofing, long-term home investment, or matching a full bathroom remodel. |
| Major Limitations | Cannot fix structural issues, flex, or deep damage. Limited color matching. Not a permanent solution. Strong fumes during application. | High cost, major disruption, reveals hidden problems (plumbing, rot). Requires skilled tradespeople (plumber, tile setter, etc.). |
| DIY Feasibility | Not recommended. DIY kits rarely last. Proper surface prep and ventilation are critical and professionally controlled. | Only for highly experienced renovators. Risks include improper waterproofing (leading to catastrophic leaks), plumbing errors, and structural mistakes. |
Let’s decode those ranges. The low end of resurfacing ($400) is typically for a standard tub in an accessible bathroom with easy prep. The high end ($800) might include a large shower pan with walls, intricate tile reglazing, or difficult access. For replacement, hitting $2,500 means you’re installing a basic acrylic tub-and-wall kit yourself (excluding plumbing and tile) or getting a phenomenal deal on a simple swap. The $5,000+ figure is reality for most professional jobs involving a mid-range tub, a tile surround, and professional labor. A full custom tile shower can easily jump to $8,000-$12,000.
Longevity is the other stark divide. A professionally resurfaced tub, if you use non-abrasive cleaners and avoid dropping heavy objects, can look great for a decade. But it will never be as hard as original porcelain or acrylic. It’s more susceptible to scratching and chemical damage from harsh drain cleaners. A new tub or shower system, installed correctly, is a decades-long solution. This lifespan claim is supported by the material warranties from major fixture manufacturers, which often cover the tub itself for a lifetime, though pro installation is always required to keep that warranty valid.
The Hidden Realities of a Full Replacement
Everyone focuses on the shiny new tub. I focus on the wall behind it. Replacement isn’t just swapping fixtures; it’s a construction project. You will find surprises. Old plumbing that isn’t to code. Rotted subfloor. Mold behind walls. Your budget needs a 15-20% contingency for these. The timeline isn’t just installation; it’s demolition, potential framing, waterproofing, and tile setting. You’re looking at a week minimum with a skilled crew. But the payoff is a truly new, durable system you can customize. You’re not just fixing a tub; you’re upgrading an entire wet area.
Demolition is the first reality check. Removing a cast iron tub is a two-person job that can damage flooring and walls. Tile demolition is dusty, messy, and can reveal that the wallboard behind it was never proper waterproof backer board—it was just drywall. Now you’re not just replacing a tub; you’re re-doing the walls to current waterproofing standards. This is non-negotiable for preventing future rot and mold. The plumbing rough-in must be exact for your new fixture. If you’re changing from a tub to a shower, or moving the drain location, this involves cutting the subfloor and potentially adjusting floor joists.
The installation sequence is critical and where many DIY efforts fail. After the tub is set and leveled, the walls must be addressed. If using tile, cement backer board goes up, seams are taped, and then a liquid or sheet waterproofing membrane is applied over the entire wet area, including the curb and floor for a shower. This system is then tested by plugging the drain and filling the pan with water. Only after it passes this flood test should tile be set. Skipping any of these steps is an invitation for a leak that you won’t discover until the ceiling below collapses.
Finally, consider the ripple effect. A new, pristine tub will make your old toilet, vanity, and flooring look worse. It often kicks off a cascade of other upgrades. The disposal of the old materials is another cost and logistics issue—many municipalities have special requirements for disposing of construction debris. You need a clear plan for where the debris goes and how it gets there.
Making Your Choice: A Practical Framework
So how do you decide? Don’t just compare price tags. Ask these questions: How long do you plan to stay in the home? If it’s less than 5 years, resurfacing is often the smarter ROI. What’s the rest of the bathroom like? A resurfaced tub next to failing tile and a cracked sink will still look bad. Who’s doing the work? A bad resurfacing job peels in a year; a bad replacement leaks and causes structural damage. Weigh the total disruption against the total benefit.
Start with a brutally honest assessment of your substrate. This is your decision point. Get in the tub. Jump lightly. Does it flex or creak? Run your hand over the surface. Are chips deep into the metal, or just in the glaze? Tap on the walls with your knuckle. Do they sound hollow and thin, or solid? If you find softness, flex, or significant rust, the conversation shifts immediately to replacement. Resurfacing is off the table.
Next, audit your goals. Is this purely cosmetic refresh, or are you craving a different experience—a deeper soaker tub, a zero-threshold shower, more space? If your desires are functional, only replacement can deliver. Also, be realistic about your tolerance for disruption. Can you manage without a shower for 3-4 days (resurfacing cure time) or for 7-10 days (replacement)? Do you have another bathroom? For a family of four with one bathroom, a one-day resurfacing job is a logistical godsend compared to a week-long remodel.
Finally, get the right quotes. For resurfacing, ask about the specific coating brand, warranty (a reputable company will offer 1-5 years), and their prep process. They should mention acid etching, sanding, and meticulous cleaning. For replacement, demand a detailed, line-item estimate. It should list the tub/shower unit model, wall material, plumbing valve, labor for demo, plumbing, installation, tile work, waterproofing method, and disposal. Any quote that’s just a single number is a red flag. Use this framework to compare apples to apples, not a single apple to an entire orchard.
Common Pitfalls I See in the Field
After hundreds of site visits, certain mistakes repeat themselves. Avoiding these will save you money, time, and a major headache.
Choosing resurfacing for a flexing or damaged substrate.
The Consequence: The new coating will crack and peel within months, often starting at the stress points like the drain or where you stand. You’ll have wasted all your money and be back to square one, but now with a flaking, ugly surface that’s harder to repair.
Prevention: Have a professional perform a thorough rigidity and soundness test before committing. A good technician will refuse the job if the base isn’t suitable. If you’re DIY-assessing, press hard everywhere and listen for cracking sounds from old coatings.
Comparing replacement quotes that don’t include the same scope.
The Consequence: A low quote might exclude plumbing, tile, or disposal, leading to massive cost overruns mid-project. You get hit with “change orders” for essential work, blowing your budget. I’ve seen homeowners get a $3,000 quote only to have it become $5,000 after the walls are open.
Prevention: Demand a line-item quote that includes demolition, materials (tub, surround, valve), labor, plumbing, tile work, waterproofing, and cleanup. Use it to compare contractors directly. If one is vague, move on.
Not planning for ventilation and cure time after resurfacing.
The Consequence: The finish stays tacky, collects dust and pet hair, or develops sags and imperfections, ruining the smooth result. High humidity can prevent proper curing, leading to a finish that remains soft and easily damaged.
Prevention: Block off the bathroom for a full 24-48 hours post-application. Run a fan in the window to exchange air, but don’t create direct drafts on the wet surface, as this can cause premature drying and wrinkling. Follow the contractor’s cure-time instructions to the letter.
Your Next Step
Your next step is simple: inspect. Get down on your knees and really look at your tub. Probe it. Tap it. Feel for flex. If it’s solid as a rock and your grievances are purely cosmetic—the color, some stains, minor chips—your path is clear. Call three reputable resurfacing pros, get detailed quotes on their process and warranty, and make it happen. You’ll have a like-new bathroom by the weekend for a fraction of the cost.
If your probe reveals softness, your foot causes the floor to bend, or you’re just tired of the whole setup and dream of something new, stop looking at resurfacing ads. You’re in replacement territory. Start talking to bathroom remodelers and get those detailed, line-item estimates. The data is on the table. The pros and cons are laid out in real-world terms. Now, the only thing left is to go look at the actual tub in front of you and make the call that fits your reality.
For a practical walkthrough, see Toilet Repair vs Replacement.