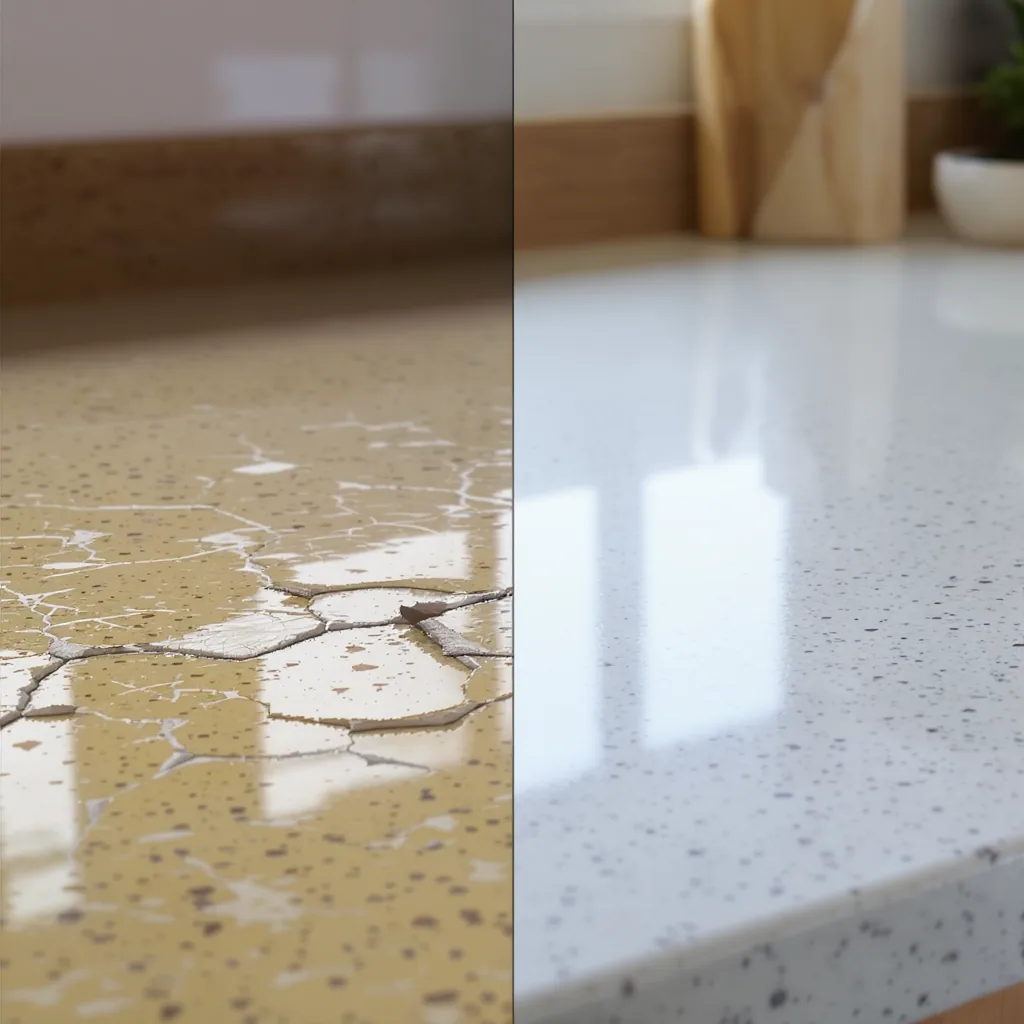
Countertop Care: Repairing Chips and Scratches vs Material Upgrade
A chip in your laminate or a scratch in your quartz presents a clear decision point: apply a precise, standards-based repair or initiate a material upgrade. The correct path depends not on aesthetics alone, but on a technical assessment of damage severity, material properties, and long-term performance specifications. This analysis provides a method-driven framework for evaluating countertop damage, comparing repair protocols against replacement specifications, and making an evidence-based decision aligned with durability standards and lifecycle cost.
1. Foundational Analysis: Classifying Damage and Material Properties
Photo by Ksenia Chernaya on Pexels
The decision matrix for countertop intervention begins with two immutable inputs: the precise identification of the substrate material and a technical classification of the damage present. Misidentification at this stage invalidates all subsequent steps, as repair protocols and material performance are not interchangeable. This foundational analysis establishes the boundary conditions for all viable paths forward.
First, conduct a material audit. Engineered quartz is a composite of ground quartz bound with polymer resins, presenting a non-porous, homogeneous surface. Natural granite is a crystalline, porous stone requiring periodic sealing. Solid surface materials like Corian are acrylic or polyester-based, allowing for thermoforming and seamless repair. Laminate consists of a printed decorative layer fused to a particleboard core. Each material has a defined hardness on the Mohs scale, porosity level, and structural composition that dictates its failure modes and repair potential. For instance, the National Kitchen & Bath Association (NKBA) provides material specification guidelines that underscore these inherent property differences.
Second, classify the damage with technical specificity. A surface scratch affects only the polish or finish layer and does not catch a fingernail when dragged across it. A chip involves material loss, creating a divot with defined edges. A crack is a fissure that may propagate through the material, often indicating structural stress. Delamination is laminate-specific, where the decorative layer separates from the substrate, typically at edges or seams. The location is critical: damage on a flat field is less consequential than on a vulnerable edge, undermount sink cutout, or over a seam.
This leads to the core concept of the Repairability Threshold. This is the point defined by three coordinates: damage depth (e.g., deeper than the polishable layer in quartz), linear dimension (e.g., a chip wider than 1/4 inch often exceeds cosmetic filler limits), and location (edge damage compromises structural integrity faster than field damage). For laminate, any damage that penetrates the decorative paper layer and exposes the brown core is at the threshold, as moisture ingress can cause swelling and irreversible failure.
2. The Repair Pathway: Method-Driven Protocols and Technical Limits
Repair is not a singular action but a set of material-specific protocols, each with a clearly defined ceiling of effectiveness. The goal is restoration within the limits of the material’s physics, not the creation of a “like-new” condition, which is often a marketing misnomer. Adherence to the correct method is non-negotiable for a durable outcome.
For laminate countertops, repair is almost exclusively focused on chip filling. The protocol involves cleaning with denatured alcohol, applying a color-matched, two-part epoxy filler, overfilling slightly, and then carefully scraping level once cured. A clear sealant or laminate paste wax can be applied for sheen. The inherent limit is stark: the repair will always be visible upon close inspection as a slight color or texture variance, and it does nothing to address the underlying vulnerability of the substrate to moisture or impact. It is a cosmetic and temporary stabilization.
Quartz and granite repair involves two distinct toolkits. For shallow surface scratches, a progressive diamond polishing pad sequence (starting from 50-grit for deep marks to 3000-grit for final polish) can often restore the surface, provided the scratch hasn’t penetrated below the resin layer in quartz or the polishable surface in granite. Chips require a high-viscosity, color-pigmented epoxy or acrylic filler. The critical steps are meticulous cleaning, precise application, curing under a razor blade or plastic film to minimize air pockets, and subsequent polishing flush with the surface. The technical limit here is profound: a deep crack or a chip that has caused a subsurface fracture (a “star fracture”) cannot be repaired to regain full strength. The filler merely masks the flaw while the compromised zone remains a future failure point, especially under point loads.
Solid surface materials offer the highest technical ceiling for repair due to their thermoplastic nature. Professional repair involves using an acrylic slurry made from cuttings of the same material, which is applied and then fused using a specialized heat gun in a process akin to welding. The area is then sanded through a grit progression and buffed to a seamless finish. While DIY kits exist, achieving a truly invisible repair requires professional-grade tools and significant skill. The limit is often color matching across different production batches and the risk of overheating, which can cause discoloration.
This establishes the universal Limit of Repair: the point where the intervention either compromises the structural soundness of the substrate (e.g., filling a crack that continues to flex) or results in a cosmetic outcome so poor that it draws more attention than the original damage. Recognizing this limit before investing time and materials is the hallmark of a method-driven approach.
3. The Upgrade Pathway: Material Specifications and Performance Benchmarks
When damage exceeds the repairability threshold, the analysis shifts from restoration to replacement. This is not merely a swap of surfaces but an opportunity to upgrade material specifications based on quantified performance benchmarks. The decision framework must move beyond aesthetics to compare hardness, chemical resistance, thermal stability, and projected functional lifespan.
The upgrade analysis begins with comparative material specifications. Engineered quartz typically scores ~7 on the Mohs hardness scale, is non-porous (requiring no sealing), and offers high stain and scratch resistance, though it has lower heat tolerance (~150°C/300°F before risk of thermal shock). Natural granite varies widely but generally falls between 6 and 7 on the Mohs scale, is porous and requires sealing, but offers superior heat resistance. Solid surface is softer (~3-4 Mohs) but allows for seamless integration and easy repair of minor damage. Porcelain slab is an emerging option with extreme hardness and near-zero porosity. A standardized test for compressive strength, such as ASTM C170, is one method laboratories use to quantify the structural performance of natural stone, providing a data point for comparison.
The cost framework has three primary components: material cost per square foot (including the slab), fabrication (cutting, edge profiling, sink cutouts), and professional installation. For a standard kitchen, installation labor can constitute 30-50% of the total project cost. It is critical to obtain quotes that itemize these components. The long-term value proposition is where upgrade justifies its cost: moving from a laminate countertop with a 10-15 year expected lifespan and vulnerability to damage to a quartz or granite surface with a 20-30+ year lifespan represents a significant increase in durability, reduced maintenance, and a quantifiable enhancement to home value, as documented in remodeling impact reports.
4. Side-by-Side Technical Comparison: Repair vs. Replacement
To move from abstract concepts to a decisive action, a structured, side-by-side comparison across key technical and practical vectors is essential. The following table and analysis provide an at-a-glance framework to evaluate the scope, commitment, and outcome of each path.
| Decision Vector | Repair Pathway | Upgrade/Replacement Pathway |
|---|---|---|
| Project Scope | Highly localized. Targets specific damage point(s). | Complete. Involves full surface removal and new installation. |
| Technical Skill Required | Variable: Laminate chip repair (Low), Stone polishing/ filling (Moderate-High), Solid surface welding (Professional). | Consistently High. Requires precise measurement, templating, handling of heavy slabs, and connection of plumbing/electrical. |
| Time Investment | Hours to 1-2 days, depending on cure times for epoxies. | Days to weeks. Includes measurement, fabrication lead time (2-4 weeks), and 1-3 day installation. |
| Direct Material Cost | Low ($20 – $150 for kits, fillers, abrasives). | High ($1,500 – $5,000+ depending on material and square footage). |
| Expected Outcome Longevity | Short to Medium (1-5 years for a quality repair; may degrade or require touch-ups). | Long (15-30+ years with proper care and maintenance). |
| Impact on Home Value & Function | Maintenance. Preserves current function but does not enhance value; may be noted as a repaired flaw in an inspection. | Enhancement. Upgrades performance specs and aesthetic appeal, typically offering a positive return on investment in a kitchen remodel context. |
This comparison reveals the fundamental trade-off: repair offers a low-cost, rapid intervention with a finite service life, while replacement demands a significant upfront investment in exchange for long-term performance and durability. The “Technical Skill Required” vector is often the decisive personal filter; a botched DIY repair on stone can create damage more costly to fix than the original flaw, effectively forcing a replacement scenario.
5. Cost-Benefit and Longevity Analysis: The Decisive Calculus
The most common strategic error is evaluating only the immediate cash outlay. A technically sound decision requires a Total Cost of Ownership (TCO) analysis over a realistic time horizon, such as 10 years. This model incorporates direct costs, the value of your time, and the probability of recurring interventions.
Consider Model A: The Repair Cycle. Initial cost is low ($100). However, if the damage is on a high-use area like a kitchen sink edge, the repair may degrade in 2-3 years, requiring a second intervention ($100 + your time). This cycle may repeat, leading to a cumulative cost of $300-400 over a decade, all while the underlying surface continues to age. At the decade mark, you still face the full cost of a replacement, which you have now deferred but not avoided.
Now examine Model B: The Upgrade Investment. Initial cost is high ($4,000). Amortized over a conservative 20-year lifespan, the annual cost is $200. Over the same 10-year period used for Model A, you have “consumed” $2,000 of that asset’s value. Crucially, you have also enjoyed 10 years of superior performance, minimal maintenance, and likely increased daily satisfaction. The remaining 10+ years of service life represent retained value in the home.
The break-even analysis is personal. If you plan to sell the home within 2-3 years, a professional repair that passes a casual inspection may be the rational choice. If you are establishing your long-term kitchen, the recurring cost, effort, and aesthetic compromise of repairs often tip the scale toward upgrade. Intangible factors—such as the frustration of a constantly chipping laminate edge or the pleasure of a pristine, functional surface—must be assigned a subjective value in this calculus. The goal is to make the hidden long-term costs of repair and the amortized value of replacement explicit.
6. Execution Planning: From Decision to Action
Once the evidence points to a clear path, execution must be governed by preparation and precision. A haphazard approach can turn a viable repair into a disaster or make a straightforward installation fraught with error.
If the decision is Repair: Begin by sourcing the correct, material-specific repair kit from a reputable supplier. For stone, this means a filler with the appropriate viscosity and UV-stable pigments. Prepare a controlled workspace: clean the area with acetone or alcohol, mask off surrounding surfaces, and ensure adequate ventilation for curing epoxies. Execute the method with patience—do not rush cure times. For polishing, use a systematic, cross-hatch pattern with each grit, and thoroughly clean the surface between stages to prevent deeper scratching from leftover abrasive residue.
If the decision is Upgrade: The planning phase is paramount. Obtain precise, wall-to-wall measurements, noting the locations of outlets, faucets, and appliances. Acquire physical samples to view in your home’s lighting. Solicit at least three detailed written quotes from fabricator/installers. A proper quote should include: slab cost, edge detail, cutouts, installation, removal/disposal of old countertops, and any plumbing/electrical disconnection/reconnection. Plan for kitchen downtime; you will be without a functional sink and countertops for 1-3 days. Verify the installer’s insurance and warranty coverage for both material and labor.
The final verification step is universal: before any work begins, establish your clear, objective criteria for project success. For a repair: “The chip is filled level, color match is acceptable under ambient light from a standing position, and no adhesive residue remains on the surrounding surface.” For an upgrade: “Seams are minimal and tight, edges are smooth and consistent, the surface is level, and all cutouts align perfectly with existing plumbing and appliances.” Defining success in measurable terms is the ultimate guard against subjective disappointment.
Common Technical and Strategic Mistakes
Even with a sound framework, execution can falter on common technical and strategic errors. These mistakes often stem from a misunderstanding of material compatibility or a short-term perspective that overlooks cumulative costs.
Mistake: Using a universal epoxy or filler without matching the base material’s composition, leading to poor adhesion, color mismatch, and premature failure.
Prevention: Always use a repair product formulated for your specific countertop material (e.g., acrylic-based for solid surface, polyester-based for quartz). Test on a hidden area first.
Mistake: Attempting to polish a deep scratch in quartz or granite with aggressive abrasives, inadvertently creating a low spot or ‘dish’ that is more visible than the original scratch.
Prevention: Assess scratch depth with a fingernail. If it catches, it may be too deep for DIY polishing. Consult a stone restoration professional for assessment.
Mistake: Making the decision based solely on upfront cost, ignoring the recurring cost and effort of temporary repairs on a failing surface.
Prevention: Conduct the 10-year cost-benefit analysis outlined in Section 5. Factor in your time, potential for repeated repairs, and the eventual inevitable replacement cost.
Mistake: Failing to seal a repaired area on a porous stone like granite or marble, leaving it vulnerable to staining around the repair site.
Prevention: After any repair on natural stone, apply a high-quality penetrating sealer over the entire surface, following manufacturer instructions for cure time.
Your Next Step
The choice between repairing and replacing a damaged countertop is not merely cosmetic; it is a technical decision governed by material science, damage mechanics, and lifecycle economics. A successful outcome hinges on resisting the impulse for a quick fix and instead applying a diagnostic sequence: identify the material with certainty, classify the damage with precision, consult the documented repair limits for that specific substrate, and then run the long-term cost-benefit model.
This analysis should yield a clear directive. If the damage sits within the repairability threshold and aligns with your skill level and time horizon, a method-driven repair using the correct materials is a rational, cost-effective solution. If the damage exceeds technical limits—whether through depth, location, or material failure—or if the upgrade offers a superior return on investment for your planned tenure in the home, then replacement is the viable path. In both cases, the result is defined by aligning method with material specifications and expectations with evidence.
Your next step is operational: begin with the Material & Damage Audit from the Primary Step Guide. Gather your specifications—material type, damage dimensions, location photos. This data-first approach transforms an emotional frustration into a solvable technical problem, providing the clarity needed to proceed with confidence toward either a precise repair or a planned upgrade.
Key Takeaways
- Accurate material identification and damage classification are non-negotiable first steps; they dictate all viable options and prevent the application of incompatible repair methods.
- Every repair method has a technical limit defined by damage depth, location, and material properties; exceeding this limit compromises structural integrity or cosmetic outcome, often forcing a later replacement.
- A material upgrade, while costly, should be evaluated on a long-term cost-benefit basis against the recurring cost, effort, and diminishing returns of repeated repairs over the same period.
- The decisive factor is often not the damage itself, but its context: your technical skill level, budget horizon, and how long you plan to use and derive value from the surface.
Frequently Asked Questions
Can you repair a deep crack in a granite countertop, or does it always require replacement?
A deep crack often signifies structural compromise. While epoxy injection can stabilize it, the repair will remain visible and may not prevent future propagation, especially under load. Replacement is typically recommended for cracks that are wide, extend through the slab, or are located on a vulnerable edge, as the material’s integrity is permanently reduced.
Is it worth repairing minor scratches and chips in a laminate countertop if I plan to replace it eventually?
Yes, as a short-term maintenance strategy. A proper chip repair can prevent moisture intrusion into the particleboard core, which causes swelling and more extensive damage. It buys time and preserves function until replacement is financially viable. View