
Flooring and Walls: When to Patch, Refinish, or Completely Replace
That sinking feeling in your stomach is all too familiar. You’ve just discovered a deep, dark scratch marring your beautiful hardwood floor, or perhaps a fist-sized hole has appeared in your once-perfect drywall. Your mind races with questions: Is this a simple weekend fix? A major project? A sign of something worse? The uncertainty can be paralyzing, leading to rushed decisions that cost more in the long run.
This guide is your calm, systematic framework for navigating that exact moment. We’ll move past the panic and provide a logical method for diagnosing damage to your flooring and walls. Our goal isn’t just to offer a quick fix, but to help you make the most cost-effective, long-term decision for your home and budget. Whether you’re staring down a localized drywall repair or weighing a full-floor refinish, the right choice starts with a clear assessment.
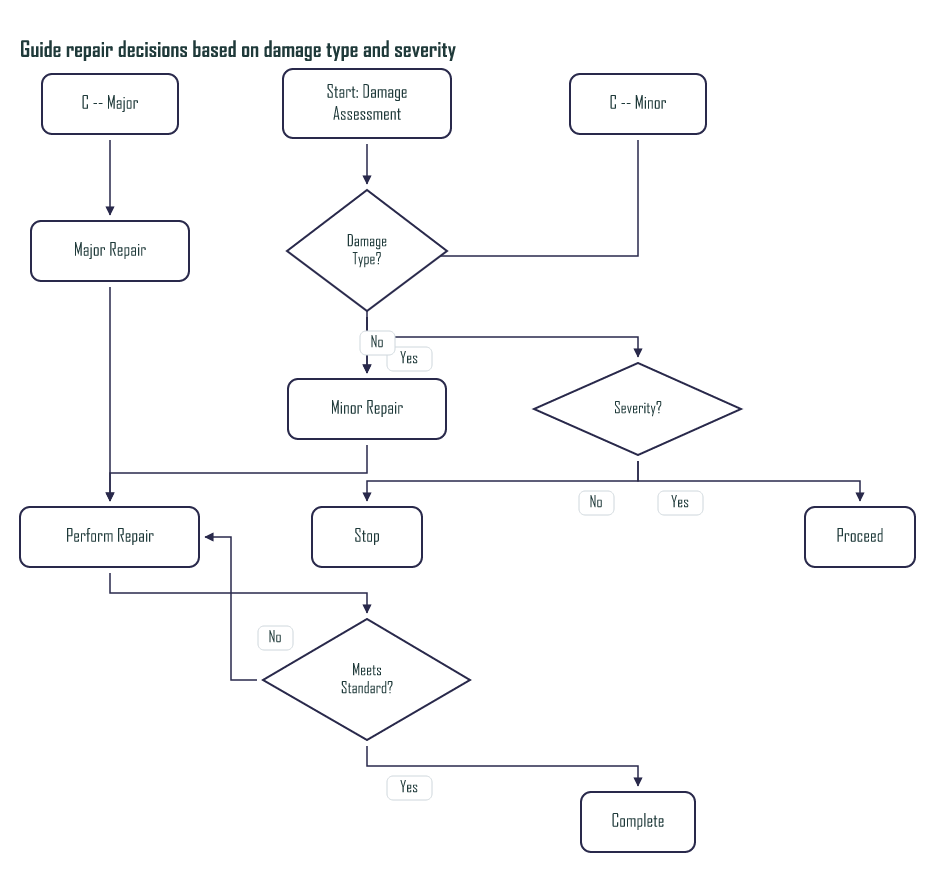
Deciding whether to patch, refinish, or replace your flooring or walls depends on three key factors: the size and depth of the damage, the overall condition and age of the material, and your budget for both immediate and long-term costs. For isolated damage like a single gouge or small hole, repair is often the most efficient solution. For widespread wear, systemic water damage, or structural compromise, a full replacement typically provides the most durable and lasting result.
The Core Decision Framework: Damage, Lifespan, Budget
Before you grab a sander or call a contractor, pause. The right choice between patching, refinishing, or replacing isn’t about the most obvious fix—it’s about the most cost-effective, long-term solution. To find it, you need to evaluate three interdependent factors: the extent of damage, the remaining useful life of the material, and your budget, both immediate and long-term. Think of it as a three-legged stool; if one leg is weak, the whole decision becomes unstable.
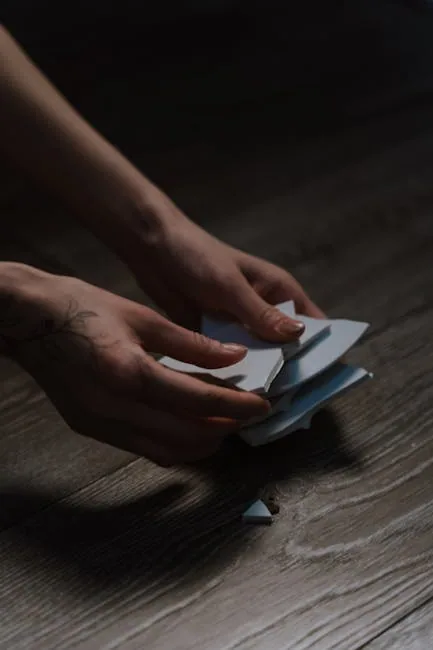
Photo by cottonbro studio on Pexels
1. Assess the Severity and Scope of Damage
Is the problem localized or systemic? A single deep scratch in an otherwise pristine hallway is a candidate for a targeted flooring repair. Widespread scratches, discoloration across an entire room, or floorboards that are cupping or buckling indicate a systemic issue that a patch won’t solve. For walls, a doorknob-sized hole is a simple drywall repair; a large water stain with soft, crumbling drywall suggests a more serious, potentially hidden problem. Always ask: Is this an isolated incident or a symptom of a larger failure?
2. Evaluate the Remaining Useful Life
How old is the material, and what condition is the rest of it in? Refinishing 30-year-old hardwood that’s already been sanded thin is a gamble, whereas giving a fresh, 5-year-old floor a new coat of finish is a smart investment. For laminate or vinyl, if the rest of the floor is fading or worn, replacing a single plank creates a mismatched “band-aid.” This factor is crucial in any flooring repair vs replace guide: pouring money into a material that’s at the end of its natural lifespan is often a waste.
3. Weigh Immediate Cost Against Long-Term Value
A cheap patch might solve today’s eyesore, but if it fails in a year and requires a full replacement anyway, you’ve doubled your cost and effort. Conversely, a full replacement for a minor flaw is overkill. Consider your timeline: Are you preparing to sell the home, or is this your forever house? A professional hardwood floor refinishing might cost a few thousand dollars but add significant value and last 10-15 years, making it a better long-term value than a shoddy, visible patch.
A real-world scenario: Imagine you discover a dark water stain on your oak floor near the fridge. The patch-and-stain approach is tempting. But if the floor is 20 years old and the finish is worn thin everywhere else, sanding and refinishing the entire room addresses the stain, renews the floor’s protective layer, and adds a decade of life—a far better return on investment than a spot fix that will remain visibly different.
Hardwood Floors: Scratches, Stains, and Structural Woes
Hardwood is unique; it can often be brought back from the brink through sanding and refinishing, making the “refinish vs replace” decision particularly nuanced. The key is to diagnose the type and depth of damage accurately. The Janka hardness scale, which measures wood’s resistance to denting and wear, is a useful reference point for understanding your floor’s inherent durability.
Surface Scratches and Light Wear
If the scratches haven’t penetrated the wood’s surface and only affect the protective finish, you’re in luck. A process called “screening and recoating” (or buff and recoat) can often restore the shine without a full sand-down. This involves lightly abrading the old finish and applying a new topcoat. It’s a fraction of the cost and mess of a full hardwood floor refinishing.
Deeper Gouges, Dents, and Stains
When damage reaches the actual wood, spot repairs become trickier. Small gouges can be filled with colored wood putty, sanded flush, and spot-finished. Water stains that have darkened the wood usually require sanding out the discoloration. A critical rule of thumb: If the damage affects more than 25% of the floor’s total area, a full sand and refinish of the entire space is almost always more cosmetically consistent and cost-effective than attempting numerous patches.
Structural Damage: Cupping, Buckling, and Gaps
This is where the decision often tips toward replacement. Cupping (edges higher than the center) or buckling (boards lifting) usually signals moisture problems from below. Sanding a cupped floor flat will often expose the board’s thinner edges, ruining it. The correct fix is to first identify and resolve the moisture source (leak, humidity, lack of vapor barrier), then replace severely affected boards. For engineered hardwood, sanding is limited by the thickness of the top veneer layer; sand through it, and you must replace the board.
Always perform the “sandpaper test”: In an inconspicuous spot, like a closet, gently sand a small area. If you see bare wood quickly, you have finish depth to work with. If you see the tongue-and-groove profile almost immediately, the floor has been sanded too many times already, and replacement should be strongly considered.
Laminate, Vinyl, and Tile: The Replacement-Leaning Surfaces
Unlike solid hardwood, most modern synthetic and ceramic surfaces are not designed to be refinished. Their repair options are more limited, which simplifies—and often narrows—your choices. The overarching principle here is that successful repair is highly dependent on having matching spare materials and an intact substrate.
Laminate Flooring
Laminate is essentially a printed image on fiberboard. It cannot be sanded or refinished. Minor scratches can sometimes be disguised with colored putty pens, but these are temporary cosmetic fixes. The real weakness is water: swelling at the seams is a death sentence for that plank. Because laminate planks are tongue-and-groove locked together, replacing one in the middle of a floor is a precise, sometimes frustrating DIY project that requires special tools to unlock the surrounding boards. If you don’t have spare planks from the original installation, finding a perfect visual match years later is nearly impossible, making full-room replacement the likely path.
Luxury Vinyl Tile/Plank (LVT/LVP)
LVT and LVP are more repair-friendly than laminate but follow similar rules. They are waterproof, so swelling isn’t an issue, but cuts or tears are permanent. The good news: many click-lock LVP systems allow for relatively straightforward plank replacement by “unclicking” rows back to the damaged piece. The bad news: again, you need an exact match. Manufacturers discontinue colors and patterns regularly. Always keep a box of spare planks after installation for future repairs.
Ceramic and Porcelain Tile
Tile work involves two components: the tile itself and the grout. Cracked or discolored grout can be carefully scraped out and regrouted, a common and effective flooring restoration task. A cracked tile, however, must be replaced. This requires chiseling out the old tile without damaging surrounding ones, which is a skilled job. The major hurdle is color and lot matching; tile dye lots can vary dramatically, so a new tile from a different batch may never blend in perfectly.
Drywall and Plaster Walls: From Nail Holes to Major Breaches
Wall repairs are generally more straightforward than floor repairs, but achieving an invisible fix requires matching both the surface level and the texture. The size of the damage dictates the method. For all water damage, the non-negotiable first step is to find and fix the source of moisture; otherwise, any repair will quickly fail.
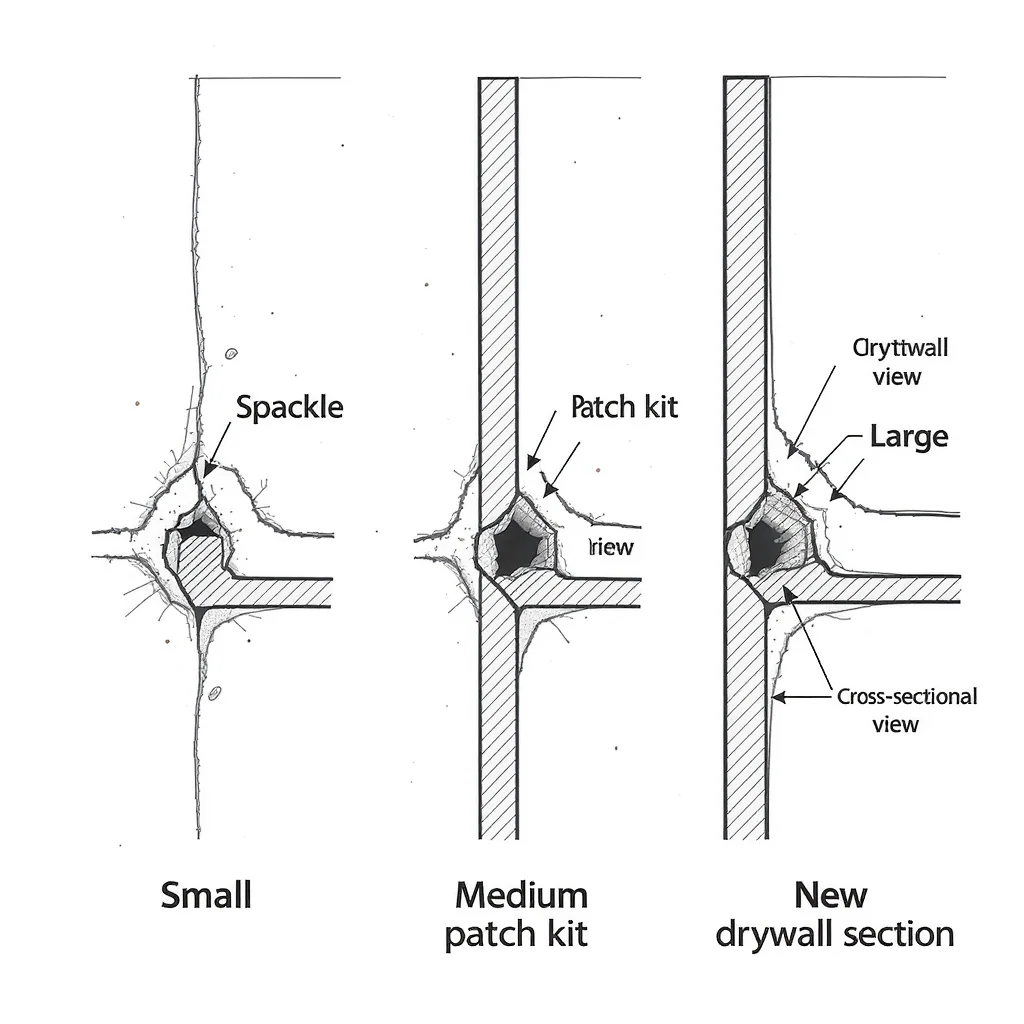
Small Holes (Up to 2 inches): Nail holes, screw holes, minor dings
This is classic, easy drywall repair. Use a putty knife to fill the hole with spackling compound or lightweight joint compound, let it dry, sand it smooth, and touch up with paint. For slightly larger holes, applying compound over a fiberglass mesh tape can add strength.
Medium Holes (2 to 6 inches): Doorknob punches, small punctures
You need backing for the patch. Peel-and-stick metal or mesh patch kits are designed for this range. You apply the patch over the hole, cover it with multiple thin layers of joint compound, feathering the edges wide to blend with the wall, then sand and paint.
Large Holes (Over 6 inches): Failed anchor, large impact damage
This requires cutting out the damaged section back to the nearest wall studs, installing a new piece of drywall secured to those studs, taping the seams with joint compound and drywall tape, and finishing with multiple coats, sanding between each. This is where skill matters most for a seamless finish.
Plaster Walls: A Special Case
Hairline cracks are common in old plaster and can be filled with a flexible caulk or plaster repair compound. Wider cracks or areas where the plaster has “keys” broken off the lath behind it require more extensive stabilization and patching, often with modern setting-type compounds. Major plaster failure may justify replacing the entire section with new drywall.
Pro Tips for an Invisible Fix
- Texture is Everything: Match the wall texture (orange peel, knockdown, smooth) by practicing on scrap board. For heavy textures, a full-wall skim coat might be needed to hide a large patch completely.
- Find the Studs: Before cutting out a large section, use a stud finder. You need solid wood on both sides of your new drywall piece to screw into.
- Prime Before Painting: Always prime the repaired area with a stain-blocking primer before applying your topcoat. This prevents the patch from absorbing paint differently and “flashing” under light.
- Paint the Whole Wall: For the best visual blend, plan to paint the entire wall from corner to corner, not just the patched area. Even with the same can of paint, age and sheen differences will show.
Side-by-Side Comparison: Patching vs. Refinishing vs. Replacing
This table consolidates the key decision factors into a quick-reference guide. Use it to compare the typical scope, investment, and outcome of each approach for both flooring and wall scenarios.
| Option | Typical Cost Range | Skill Level Required | Time Investment | Expected Longevity | Best For… |
|---|---|---|---|---|---|
| Patching (Floor/Wall) | $20 – $200 (DIY) $150 – $500 (Pro) | Beginner to Intermediate | Few hours to a day | 5 – 15+ years (if done well) | Isolated damage: single cracked tile, small drywall hole, deep scratch on one floorboard. |
| Refinishing (Floor) | $3 – $8 per sq. ft. (Pro) $1 – $2 per sq. ft. (DIY rental) | Advanced DIY or Professional | 3 – 5 days (including dry time) | 10 – 25 years | Widespread surface wear, discoloration, or light scratches across most of a hardwood floor. |
| Replacing (Floor/Wall) | $5 – $15+ per sq. ft. (Floor) $1.50 – $3 per sq. ft. (Drywall) | Professional Recommended | 1 – 7+ days | 15 – 50+ years | Structural damage, water-ruined subfloor, outdated material, or damage affecting >25% of the area. |
Common Pitfalls and Costly Misdiagnoses
Even with a good plan, it’s easy to make a wrong turn. Here are frequent errors homeowners make when facing wall damage assessment or floor dilemmas, and how to avoid them.
1. Refinishing Over a Failed Subfloor
The Pitfall: Investing in sanding and finishing a beautiful hardwood floor that’s installed over a squeaky, uneven, or moisture-compromised subfloor.
Why It Fails: The new finish will look great for a month, but the underlying movement will cause cracks, squeaks, and premature finish failure. You’ve wasted the refinishing money.
Correct Approach: Before committing to refinishing, have a professional assess the subfloor’s condition. Addressing subfloor issues first is non-negotiable.
2. Patching Laminate or Vinyl Without Addressing Moisture
The Pitfall: Replacing a swollen laminate plank without figuring out why it swelled.
Why It Fails: The new plank will swell, too. The moisture source (leaking appliance, humidity, concrete slab moisture) is the real problem.
Correct Approach: Always use a moisture meter to check the surrounding area and subfloor. Fix the source of moisture absolutely before any repair.
3. Using the Wrong Compound for Large Drywall Repairs
The Pitfall: Using lightweight spackle to fill a 4-inch hole.
Why It Fails: Spackle shrinks and cracks when applied thickly. The repair will fail, sag, or be visible.
Correct Approach: For holes over 2 inches, use a setting-type joint compound (like “hot mud” that comes in a bag) or a pre-mixed joint compound applied in multiple thin layers with reinforcing tape.
4. Ignoring Underlying Mold or Structural Issues
The Pitfall: Seeing water damage, painting over the stain, and calling it a day.
Why It Fails: You’ve sealed in mold and potentially rot, which will spread and cause health issues and far more expensive structural repairs.
Correct Approach: Any water damage requires investigation. Cut out a small section of wet drywall or flooring to inspect the cavity behind. If you see mold or rot, stop and consult a professional for remediation. The EPA’s mold cleanup guide provides a solid baseline for understanding safe procedures.
Making the Final Call: Questions to Ask Yourself
You’ve assessed the damage, checked the lifespan, and crunched the numbers. To lock in your decision, run through this final, practical checklist. Your honest answers will point you toward the right choice in your flooring repair vs replace guide journey.
Will the repaired spot be visually acceptable to me, or will I notice it every day? If you’re a perfectionist, a patch on a prominent area will always bother you, making replacement or full refinishing the better psychological investment.
Is this repair part of a larger, impending renovation? If you plan to gut the kitchen in two years, a professional-grade fix on the floor might be overkill. A functional, cosmetic patch could be the smarter stopgap.
Am I fixing the symptom or the cause? This is the most critical question. Refinishing a floor with an unresolved moisture problem, or patching a wall crack caused by a settling foundation, is wasted money. Always address the root cause first.
What are the resale value implications? A professionally refinished hardwood floor is a strong selling point. A poorly patched floor or visibly repaired wall can raise red flags for buyers and potentially lower offers. Consider the market standard for homes in your area.
Does my budget have room for the “right” fix, or only the “right now” fix? Be realistic. If the proper repair stretches your finances too thin, it’s okay to choose a quality temporary solution while you save, as long as you understand it’s temporary and plan accordingly.
Protecting Your Investment with the Right Choice
There’s no universal “right answer” when damage appears on your floors or walls, only the most right answer for your specific situation. The tension between a quick patch and a lasting replacement is a classic homeowner’s tradeoff. By systematically applying the framework of damage scope, material lifespan, and true cost, you move from a place of panic to one of control.
Remember, the goal isn’t just to make the problem disappear today—it’s to ensure it doesn’t reappear tomorrow at a greater expense. Whether you embark on a DIY drywall repair or contract a full hardwood floor refinishing, a methodical decision protects both your home’s value and your peace of mind. Invest the time in assessment, and you’ll invest your money wisely.