
Plumbing Fixtures: Repair, Refresh, or Full Replacement Guide
That persistent drip in the kitchen sink. The showerhead that’s lost its vigor. The toilet that runs long after you’ve flushed. If you’re a homeowner, these aren’t just minor annoyances—they’re a source of genuine frustration and a confusing financial puzzle. Do you keep throwing money and weekend hours at repairs, or bite the bullet on a full replacement? The fear of making the wrong call—wasting cash on a fix that fails in six months or overspending on a new fixture you didn’t really need—can leave you stuck in indecision.
This guide cuts through that noise. We’ll walk you through a clear, logical framework for every major plumbing fixture decision, balancing immediate cost, long-term value, and your personal goals for your home. Whether you’re facing a simple kitchen faucet repair or contemplating a full bathroom fixture replacement, you’ll learn how to diagnose the problem, weigh your options, and make a choice that brings you peace of mind, not buyer’s remorse.
The decision to repair, refresh, or replace a plumbing fixture hinges on three factors: the cost and complexity of the fix, the age and condition of the fixture, and your goals for aesthetics and water efficiency. Generally, if a repair is simple and cheap, or the fixture is fairly new, fix it. If it’s constantly breaking, inefficient, or outdated, replacement is the smarter long-term investment. The right choice balances your immediate budget with the long-term value and performance you want from your home.
The Core Decision Framework: Cost, Condition, and Goals
Every plumbing fixture dilemma can be broken down into three critical factors. By evaluating each one systematically, you can move from gut feeling to a logical choice. Think of this as your personal decision matrix for plumbing fixture repair vs replace.
1. The Cost Factor: The 50% Rule
This is your financial litmus test. Get a rough estimate for the repair (parts and your time or a pro’s labor) and compare it to the total cost of a new, comparable fixture plus installation. A widely accepted guideline is the 50% Rule: if the repair cost exceeds 50% of the replacement cost, replacement is almost always the smarter financial move. Why? You’re investing significant money into an aging asset with a high likelihood of another failure soon. For a simple DIY fix like a $10 washer, repair is obvious. But if a pro quotes you $200 to rebuild a faucet you could replace for $300, the scale tips toward replacement for long-term reliability.
2. The Condition Factor: Age and Symptoms
How old is the fixture, and what exactly is wrong? Condition is more than just the current leak. Assess the fixture’s physical state and performance history.
- Age & Lifespan: Most quality faucets and shower valves last 15-20 years; toilets can last 50 years but their internal parts wear out. If your fixture is nearing or past its expected lifespan and having issues, replacement often makes more sense than pouring money into a series of repairs.
- Chronic Issues: Is this the third time you’ve fixed the same drip? Chronic problems are a red flag for underlying wear or design flaws.
- Visible Damage: Look for cracks in porcelain, significant corrosion or pitting on metal surfaces, and mineral deposits that are fused to the fixture. These are signs the fixture body itself is failing.
- Performance Failures: Consistently low water pressure (after cleaning the aerator), inability to maintain consistent temperature, or a toilet that requires frequent jiggling of the handle are functional failures that often justify replacement.
3. The Goals Factor: Aesthetics and Efficiency
This is the personal, often overlooked, component. Your goals for your home can tip the scale even when a repair is technically feasible.
- Aesthetics & Style: Is the fixture outdated, a mismatched finish, or simply not your taste? The desire for a cohesive, modern look is a valid reason for upgrading plumbing fixtures.
- Water Efficiency: Older toilets use 3.5 to 7 gallons per flush (gpf). Modern WaterSense models use 1.28 gpf. An old, water-guzzling fixture is an environmental and financial drain. Replacing it can pay for itself in water savings.
- Convenience & Features: Do you want a pull-down kitchen faucet, a hands-free sensor, or a shower system with body jets? The desire for new functionality is a strong driver for replacement over repair.
Fixture-by-Fixture Diagnosis: From Faucets to Toilets
Let’s apply the framework to the most common fixtures. This walkthrough helps you diagnose the problem, identify a potential fix, and recognize the red flags that signal it’s time for a bathroom fixture replacement or a kitchen upgrade.
Kitchen & Bathroom Faucets
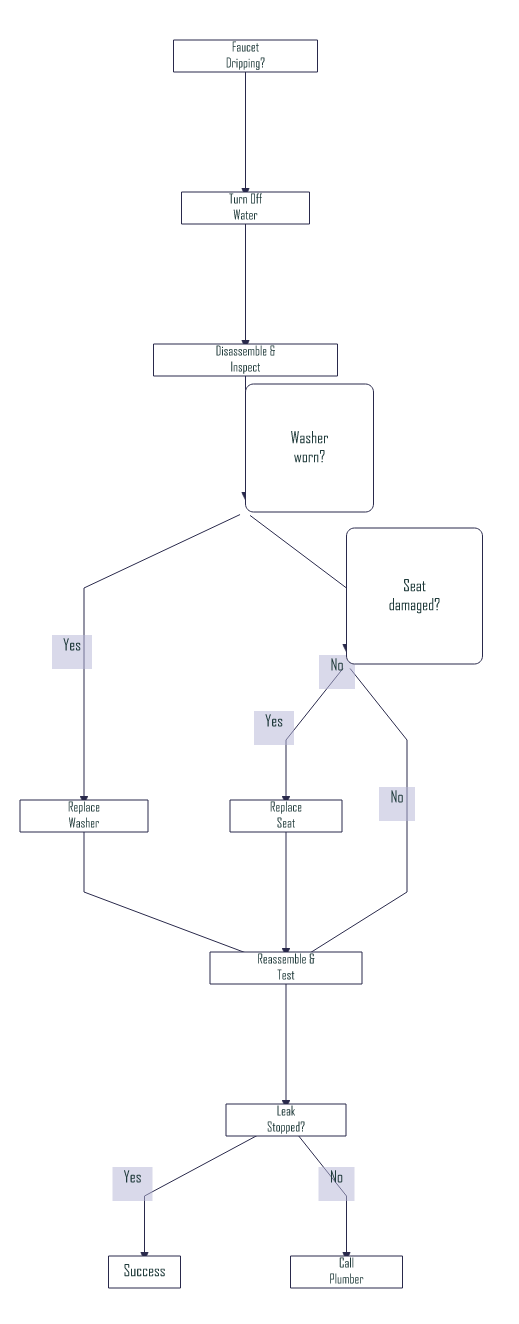
Common Repairs: Most leaks stem from internal wear. For compression faucets (two handles), replacing the rubber washer is a classic kitchen faucet repair. For single-handle cartridge, ball, or ceramic disc faucets, replacing the cartridge or the entire mechanism is the standard fix. Cleaning or replacing the aerator solves sputtering and low flow.
Refresh Options: Swap out handles and knobs for a new look. Replace a standard aerator with a laminar-flow model for a smoother stream.
Replacement Red Flags: The fixture body is cracked or heavily corroded; the leak originates from a non-serviceable part like the spout base; the specific cartridge or part is obsolete and unavailable; you have persistent low pressure that isn’t solved by cleaning the aerator (could indicate clogged pipes).
Toilets
Common Repairs: A running toilet is often a $10 flapper valve replacement. A weak flush can be fixed by adjusting the water level in the tank or cleaning the rim jets. A wobbly toilet may just need the closet bolts tightened (after checking for wax ring leaks!).
Refresh Options: Install a new toilet seat and lid. Add a bidet attachment. Replace the flush handle.
Replacement Red Flags: Cracks in the porcelain (especially in the tank or bowl); a toilet that is constantly clogging despite proper use (could be an outdated, poorly designed trapway); it’s an old 3.5+ gallon per flush model; the bowl is stained beyond cleaning; or it’s a rare color like mint green or pink that makes finding repair parts difficult.
Showerheads & Tub/Shower Valves
Common Repairs: For a dripping showerhead, the issue is usually in the valve behind the wall (cartridge replacement). For poor spray, soak the showerhead in vinegar to descale it.
Refresh Options: Simply unscrew the old showerhead and screw on a new, high-efficiency model. This is the easiest upgrade in plumbing. Replace the tub spout or escutcheon plate.
Replacement Red Flags: You can’t get consistent temperature control (a sign of a failing pressure-balancing or thermostatic valve cartridge, which can be expensive); the valve itself is leaking behind the wall; you have a single-handle shower valve from the 1980s or earlier—some cartridges are no longer made, forcing a full valve replacement, which is a significant project.
Sink Drains & Pop-ups
Common Repairs: Clearing clogs with a plunger, drain snake, or enzyme cleaner. Adjusting the pop-up linkage under the sink to make it open and close properly.
Refresh Options: Replace the visible drain flange and pop-up stopper with a new finish. Install a sleek grid-style drain strainer.
Replacement Red Flags: The drain pipe itself (not the stopper) is cracked or leaking; the sink basin is damaged around the drain; you’re switching from a two-handle to a single-handle faucet and the old holes don’t line up, requiring a new sink or a deck plate.
Repair vs. Replace: The Cost-Benefit Breakdown
This comparison table puts concrete numbers and scenarios to the abstract decision. Costs are approximate national averages and can vary widely by region, fixture brand, and labor rates. The “Scope” describes what’s typically involved.
| Fixture Type | Typical Repair Cost & Scope | Typical Replacement Cost & Scope | When Repair Wins | When Replacement Wins |
|---|---|---|---|---|
| Kitchen Faucet | $20 – $50 (DIY cartridge) $150 – $300 (Pro for cartridge/valve) | $250 – $800+ (Fixture + Pro Install) Scope: Remove old, install new, hook up supply lines, test. | Fixture is <10 yrs old, good condition, simple cartridge swap. You like the style. | Body is corroded, leak is at base, part is obsolete. You want modern features (pull-down, touchless). |
| Bathroom Faucet | $15 – $40 (DIY cartridge/washer) $125 – $250 (Pro) | $200 – $600+ (Fixture + Pro Install) Scope: Similar to kitchen, often simpler access. | Minor drip from handle, recent fixture, cosmetic condition is good. | Widespread corrosion, outdated 4″ center set when you want widespread. Seeking WaterSense certification for efficiency. |
| Toilet | $10 – $30 (DIY flapper/fill valve) $100 – $200 (Pro for internal rebuild) | $400 – $1,200+ (Toilet + Pro Install) Scope: Remove old toilet, replace wax ring, install & secure new toilet, hook up water. | Constant running water. All internal parts are readily available. Bowl/tank are sound. | Cracked porcelain, >3.5 GPF model, chronic clogs. The EPA’s WaterSense program highlights the significant water savings of modern 1.28 GPF models. |
| Shower Valve (Behind Wall) | $50 – $150 (Part) + $200 – $500 (Pro Labor) Scope: Access panel or tile cut, cartridge swap. | $1,000 – $3,000+ (Valve + Trim + Pro Labor) Scope: Significant wall access, plumbing modifications, possible retiling. | You have access panel, exact cartridge model is known and available. Valve body is sound. | Valve body is leaking, cartridge is obsolete, you want to upgrade from pressure-balance to thermostatic for safety. |
| Showerhead | $0 (Vinegar soak) – $20 (New washers) | $50 – $300 (Fixture only, DIY) Scope: Unscrew old, apply tape/dope, screw on new. | Flow issue is due to mineral buildup. The showerhead itself isn’t damaged. | It’s a cheap, inefficient model. You want a rainfall, handheld, or high-efficiency WaterSense model. |
The ‘Refresh’ Middle Ground: Cosmetic and Partial Upgrades
Before you commit to a full tear-out, consider the power of a refresh. This path updates look and feel, and sometimes function, for a fraction of the cost and effort of replacement. It’s ideal when the fixture works fine but looks tired, or when you want a quick win.
Refreshing works best on fixtures with a solid, leak-free core. The goal is to change the user-facing parts without disturbing the underlying plumbing.
Quick-Refresh Projects Under $100
- Update Handles & Knobs: Swap out old lever handles for cross handles or modern blades. This can completely change a faucet’s personality.
- Replace the Showerhead: This is the single most impactful refresh. Installing a new showerhead with a handheld wand can transform your shower experience instantly.
- Install New Aerators: For a few dollars, you can get aerators that improve flow feel, reduce splashing, or even have built-in filters.
- Upgrade the Kitchen Faucet Sprayer: If you have a side sprayer, you can often replace just the hose and spray head with a new, longer-reach model.
- Change Drain Hardware: A new pop-up assembly or a stylish grid drain cover makes a sink look cleaner and more intentional.
- Replace the Toilet Seat: A slow-close, soft-close seat is a small luxury that makes a big difference in daily use and cleanliness.
The Limitations: A refresh won’t fix mechanical failures inside the fixture. It also can’t change the fundamental mounting style (e.g., turning a centerset faucet into a widespread one). And if the base finish is worn, new handles in a different finish might look mismatched.
Navigating the Replacement Process: A Buyer’s Guide
Once you’ve decided replacement is the right path, a smart purchase prevents future headaches. It’s not just about picking a pretty finish.

1. Measure and Match: The Fit Check
This is the most critical step to avoid returns. For sinks, measure the distance between the mounting holes (center-to-center). Standard setups are 4″ for bathroom centerset faucets, 8″ (or more) for widespread, and a single hole for many kitchen faucets. For showers, know your existing valve’s “rough-in” size to ensure the new trim plate will cover the old holes. As noted in many manufacturer technical manuals, assuming fit can lead to costly modifications.
2. Understand Valve and Connection Types
Know what’s behind the wall or under the sink. Most modern faucets use cartridge systems, but the specific cartridge must match. If possible, remove your old cartridge and take it to the store. Also, check your supply line connections (usually 3/8″ compression) to ensure compatibility with the new fixture’s tails.
3. Choose Finishes with Future-Proofing in Mind
Popular finishes like brushed nickel, matte black, and chrome are widely available, making future repairs or matching accessories easy. Rare or trendy finishes might be hard to match later. Also, consider durability; some PVD (Physical Vapor Deposition) finishes are more scratch-resistant than simple painted finishes.
4. Prioritize Performance and Certification
Look for the WaterSense label for faucets and showerheads. It guarantees water efficiency without sacrificing performance. For toilets, WaterSense certification is a must for both water savings and reliable flush performance. Don’t just buy the cheapest fixture; a slightly higher investment in a brand known for quality and readily available replacement parts pays off in longevity.
Common Pitfalls and Costly Missteps to Avoid
Even with a good plan, simple errors can turn a straightforward project into a disaster. Here are the most frequent missteps and how to sidestep them.
1. Using the Wrong Tools (and Force)
Using adjustable pliers on a chrome nut will almost certainly mar the finish. Using a pipe wrench where a basin wrench is needed can damage fittings. The mistake of overtightening connections—”one more turn for good luck”—can crack valves or create hairline fractures that leak later. Prevention: Invest in a few specialty tools like a basin wrench and strap wrenches. Hand-tighten, then give a gentle quarter-turn with the tool. Use tape and dope on threaded connections, not brute force.
2. Ignoring the Root Cause
Fixing a leaky faucet but ignoring extremely hard water that will quickly destroy the new cartridge. Replacing a toilet fill valve without checking the home’s water pressure (high pressure can blow out new valves). Prevention: Ask “why did this fail?” If it’s a recurring issue, investigate systemic problems like water quality or pressure.
3. Forgetting to Shut Off the Water
It sounds obvious, but in the rush to start, people often turn off just the fixture’s local stops, not the main house valve. If those old, rarely-used local valves fail, you’ll have a flood. Prevention: Always shut off the water at the main valve before starting any project that involves opening a water line. Test that the water is off by opening the fixture you’re working on.
4. Mismatching Metals and Finishes
Installing a brass supply line directly to a stainless steel faucet tailpiece can cause galvanic corrosion over time. Mixing oil-rubbed bronze handles with a chrome faucet body looks haphazard. Prevention: Use dielectric unions to connect dissimilar metals. Buy all visible components (faucet, handles, drain, towel bars) in the same finish family from the same manufacturer if possible.
When to Call a Professional: Recognizing Your Limits
DIY spirit is admirable, but plumbing has consequences. Knowing when to call a licensed plumber protects your home and your wallet. This guide helps you assess, but a visual inspection by a pro is irreplaceable for complex or risky jobs.
Call a pro when you encounter:
- No Local Shut-Off Valves: If you can’t isolate the fixture, you’re risking shutting down water to the whole house during a simple repair, which increases the stakes of any mistake.
- Galvanized Steel Pipes: These old pipes are often corroded shut internally. Trying to disconnect a fixture can cause the pipe to snap, requiring emergency repiping.
- Moving Fixture Locations: Want to move the toilet 6 inches? That involves breaking concrete, moving drain and water lines, and precise re-leveling—a job for a pro with the right tools and knowledge of code.
- Whole-House or Multi-Fixture Issues: If every faucet has low pressure, the problem is in your main line or pressure regulator, not the fixtures.
- Gas Lines: Any work on gas lines for water heaters or stoves must be done by a licensed professional. Period.
- Permit-Required Work: Major replacements like a water heater or re-piping often require permits and inspections to ensure they meet code. A licensed plumber handles this process.
Remember, a professional doesn’t just fix the symptom; they diagnose the system. Paying for an hour of a plumber’s time for a diagnosis can save you thousands in misguided DIY repairs or water damage.
Making Your Choice with Confidence
The journey from a dripping faucet to a resolved issue doesn’t have a single map. As we’ve seen, the “right” choice in the plumbing fixture repair vs replace debate is a personal calculus. It weighs your immediate budget against long-term value, your DIY skill against the complexity of the job, and your tolerance for an outdated look against the desire for modern efficiency.
There’s a quiet tradeoff in every decision: the certainty of a known repair cost versus the potential of a higher upfront investment that eliminates problems for a decade or more. Neither path is inherently wrong. The goal of this framework isn’t to give you a single answer, but to replace confusion with clarity. By systematically evaluating cost, condition, and your own goals, you can move forward with a plan you understand and trust—whether that means grabbing a wrench, ordering a new fixture, or confidently picking up the phone to call a professional.
For additional context, refer to Appliance Repair vs Replace.